Top 5 Ways of Personalising an iPad to meet Educational Needs
An iPad can aid personalised learning in all sorts of ways. The flexibility and infinite nature of the App Store means that an individual can stretch their imaginations as far as they like. Any learning objective can be completed in a myriad of ways and can be tackled using the multimedia capabilities that are built in to an iPad. The microphone, speakers, touchscreen, camera and Apple pencil offer choice, so that a learner can lean into their preferences. Without delving into the settings, anyone can find their own way of doing things on an iPad.
However, this is just the tip of the iceberg. The accessibility settings within the latest iPad iOS (17.4.1 at time of writing) are a pandoras box of personalisation options. These settings can be hugely impactful. Learners with any kind of Special Educational Need can usually find some ‘game-changing’ features buried in this box of tricks. Some of the settings can change how an individual interacts with their iPad in a profound way. Some features result in little tweaks that can make life easier. In short, the accessibility features are your gateway to a longer and deeper list of personalisation options.
Here are my top five ways of personalising your iPad by making use of ‘out of the box’ tricks and by playing around with the accessibility features…
1. Changing your keyboard
The touchscreen keyboard is very flexible. You can add a whole host of different languages to the keyboard in the settings of the iPad. Once the language is selected, spellcheck and auto-corrections switch on as well. Even Siri dictation will work in any native tongue. Let’s pause for a moment to think about Siri dictation. Not only is this a useful tool for anyone with poor fine motor skills, but it also offers a unique way of finding the spellings of difficult words. Ultimately, it’s also another option for anyone who prefers to dictate. When it comes to typing, however, the keyboard can adhere to all sorts of personal preferences. Firstly, you can swipe your fingers away from each other to split it in half. This allows someone to type with just their thumbs either side of the iPad and it means the writer can see more of the screen. In the accessibility settings, you can make the keys more ‘sticky’ which slows down the keyboard and reduces typos. It’s a part of the iPad that is accessed all the time, but I imagine no one is harnessing all of the keyboard’s functionality.

2. Customising Widgets
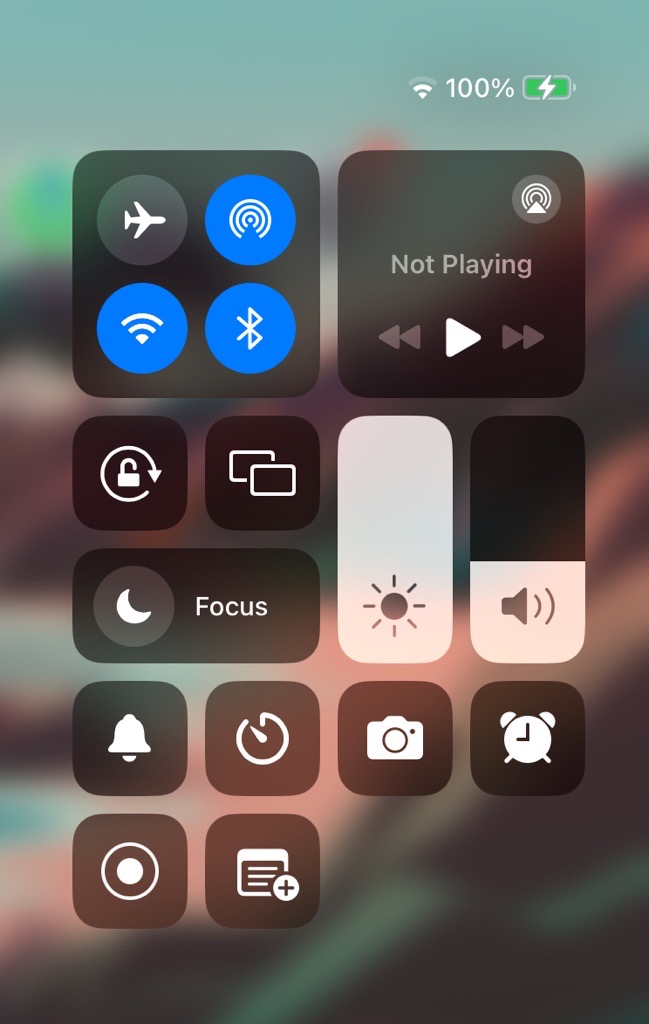
Learners need to be on top of a lot of different things during a normal school day. Secondary school students must know their timetable; keep notes on a myriad of different subject demands; organise their own workloads; keep work resources up-to-date and be responsible for their iPad, among other things. When it comes to keeping organised, the iPad’s customisable widgets (shortcut buttons) are a potential game changer. Firstly, if you swipe all the way to the right on an iPad home screen, you’ll find useful updates and insights about your iPad and apps. Things like, how much charge you have on an Apple Pencil or which apps have been used most recently. You can customise these insights by adding specific widgets that point to useful app notifications, or you can set up shortcuts to app features. For example, you can quickly access the ‘List Function’ on OneNote through the insight widgets. On the other side of the home screen, you can swipe down diagonally from the battery percentage icon to reveal the ‘control centre’. Here you’ll find shortcuts to the notes app, timer, camera, and much more. Again, these widgets are customisable. In the settings of the iPad, you can add more controls, such as ‘Quick Note’, ‘Code Scanner', and ‘Stopwatch’. All of these little personal touches that an individual can add to an iPad add up to a completely custom experience that can really help with the day-to-day logistics of school life.
3. Personalising Displays and Text Size
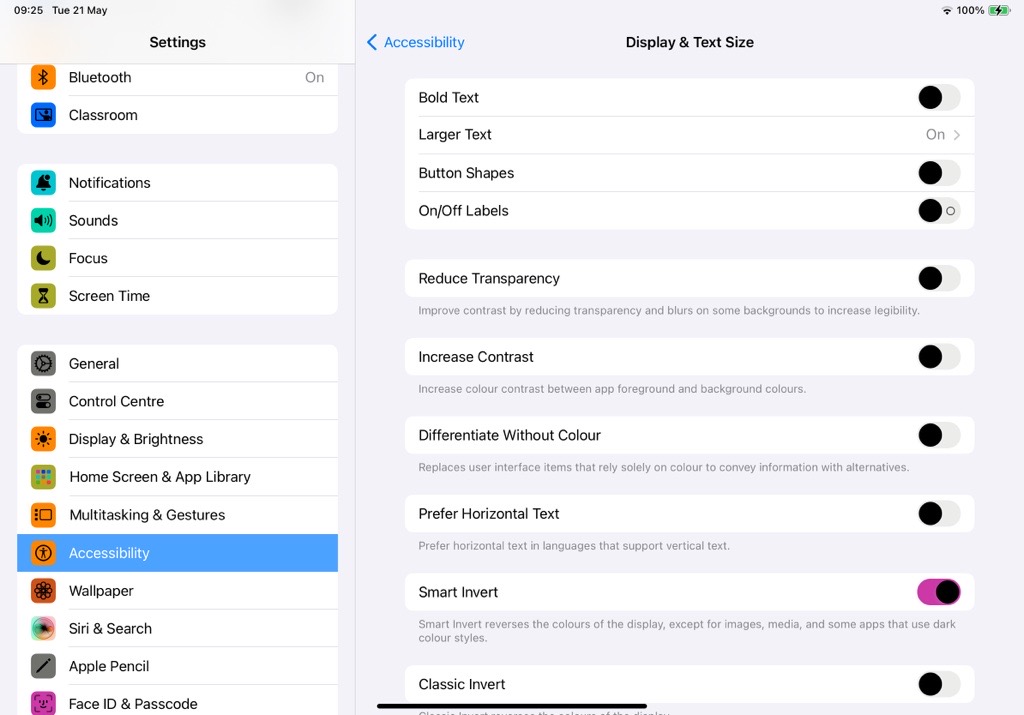
You would be forgiven for thinking that the accessibility features (found in the settings app) on an iPad are specifically designed for individuals with recognised educational needs. The fact is the accessibility settings contain personalisation features that are good for anyone (specific need or not). One such list of treasures is titled ‘Display & Text Size’. The iPad screen is bright and colourful. It catches your eye and is designed to draw you in. However, if you’re working on a screen all day, you may wish to dim the screen or dull the colours. If you have visual impairments, you may need to invert the screen or increase the contrast. Learners with dyslexia might look to put a specific colour hue over the top of the screen to help them track text. All these options (and more) are possible. When it comes to ‘Text’, iPad users can embolden the onscreen type and customize the size of the words. You see it all the time on iPhones. Misplaced your glasses? Make the text much bigger and bolder. On an iPad, the size of the text can go further than iPhone because the screen is that much bigger. So, one subsection of a long list of accessibility settings can make a big difference for an individual iPad user.
4. Turn Live Speech on in the Background
As aforementioned, the accessibility settings are for everyone and anyone. However, some of the features offer personalised experiences that meet more acute needs. For example, ‘Live Speech’ has just appeared in the accessibility list and this functionality has the potential to aid learners with language and/or speech impediments. Let me start by explaining what this setting is and how you can set it up. The ‘Live Speech’ keyboard offers a simple way of turning text to speech. Users can type words, sentences or full-on paragraphs before hitting the return button and having Siri say it out loud. Within the settings of ‘Live Speech', you can add ‘Favourite Phrases’. When this bank of sentences are added, the keyboard offers access to these phrases and therefore they can be called upon time-and-time again. The ‘Live Speech’ keyboard must be turned on in the accessibility settings, and then (no matter where you are on iPad), an individual can triple click the top button to make the keyboard pop up. There is an obvious group of learners that could benefit by having ‘Live Speech’ on in the background. However, it’s also worth noting the less obvious groups that could gain a huge amount from this functionality. Non-English speakers may learn how to type a word before fully grasping it’s pronunciation. Chronically shy learners might find their voice through Siri. Many teachers (including myself) have lost their voices at some point in the term and this functionality could help in that case. What I particularly like about this accessibility feature is that it offers a personal aid on a popularist device. In other words, a student using an iPad among other iPads is less likely to be singled out. Speech aids in the past have mostly been specific bits of kit. Now a learner can have a personalised technological experience on a non-alienating device.

5. Choosing multi-tasking and gesture settings
When it comes to personalisation, changing the touch gestures is a big one. The iPad is almost all screen. We tap and swipe our way around. Customizing those touch screen gestures means that you’re changing an iPad experience extensively. In the standard settings of the iPad, you can opt to turn ‘Productivity Gestures’ and ‘Four & Five Finger Gestures’ on or off. In the accessibility settings, you can go one step further by creating your own swiping / tapping commands. It all comes down to personal preference and how an individual feels they should navigate around their iPad. Anyone with poor fine motor skills or a disability that prevents them from doing some of the four/five finger fancy gestures can do away with them all together and replace the gestures with their own. Multi-tasking options on an iPad can also be personalised. Split screen functionality enables you to work on two apps at once. Likewise, it’s possible to drag an app from the iPad’s dock on top of another. This means you have an app on top of another app. That all being said, if you’re someone who feels overwhelmed by multiple screens, you can turn these features off. Apple are keen to make sure that each individual finds as much productivity from their device as possible. So, if that means that you need to reduce the number of fancy gestures available, or you favour a more linear approach as oppose to multitasking, then the iPad has you covered.
In a classroom, no learner should be left behind. Everyone should be given the opportunity to thrive in their own way. In reality, that is very hard for a teacher. When you’re working with a class of thirty learners, it’s near impossible to provide a personalised experience. The iPad can though. Each class member could customise their device to meet their needs. They can approach learning objectives in different ways. They can utilise different tricks or apps to navigate their way through the lesson. You would be hard pressed to find any other school resource that offers the same level of personalisation. In fact, I don’t believe that any other pieces of technology offer the same level of innovative and intuitive personalisation. As educators, we’re task with an odd juxtaposition. We’re partly responsible for helping learners grow into independent thinkers with their own learning styles. Yet, we have to teach the same broad strokes to everyone, and schools actively promote herd mentalities in so many ways. Finding a balance is hard. An iPad can be one small step towards a more individualised education. It can give a learner more ownership of their educational choices. The technology can be an extension of who they already are and help steer them towards who they might become.
Find out more about iPad in the classroom.